Ever pulled back on your kite line and felt it go slack, then suddenly snap tight like a rubber band? That sudden jerk isn’t just annoying-it can send your kite into a tailspin or even snap your line. The secret to smooth, controlled flight isn’t just wind or kite design-it’s kite line tension regulators. These small devices turn wild, unpredictable flights into calm, precise maneuvers, especially in gusty conditions or when flying high-performance kites.
Why Kite Line Tension Matters
Kite lines aren’t just strings. They’re the direct link between you and the kite’s behavior. Too loose, and the kite loses responsiveness. Too tight, and it overreacts to every puff of wind. The ideal tension keeps the kite stable, allows for sharp turns, and prevents sudden dives or stalls.
Think of it like driving a car. If your steering wheel had no resistance, you’d overcorrect constantly. If it was locked stiff, you couldn’t turn at all. Kite line tension regulators act like power steering for your kite-balancing control and sensitivity.
Most recreational flyers don’t realize this, but modern sport kites, especially dual-line and quad-line models used in freestyle or competition, rely on consistent tension. Without a regulator, wind gusts cause wild fluctuations. One second, your kite hovers perfectly. The next, it’s diving toward the ground because the line went slack.
How Kite Line Tension Regulators Work
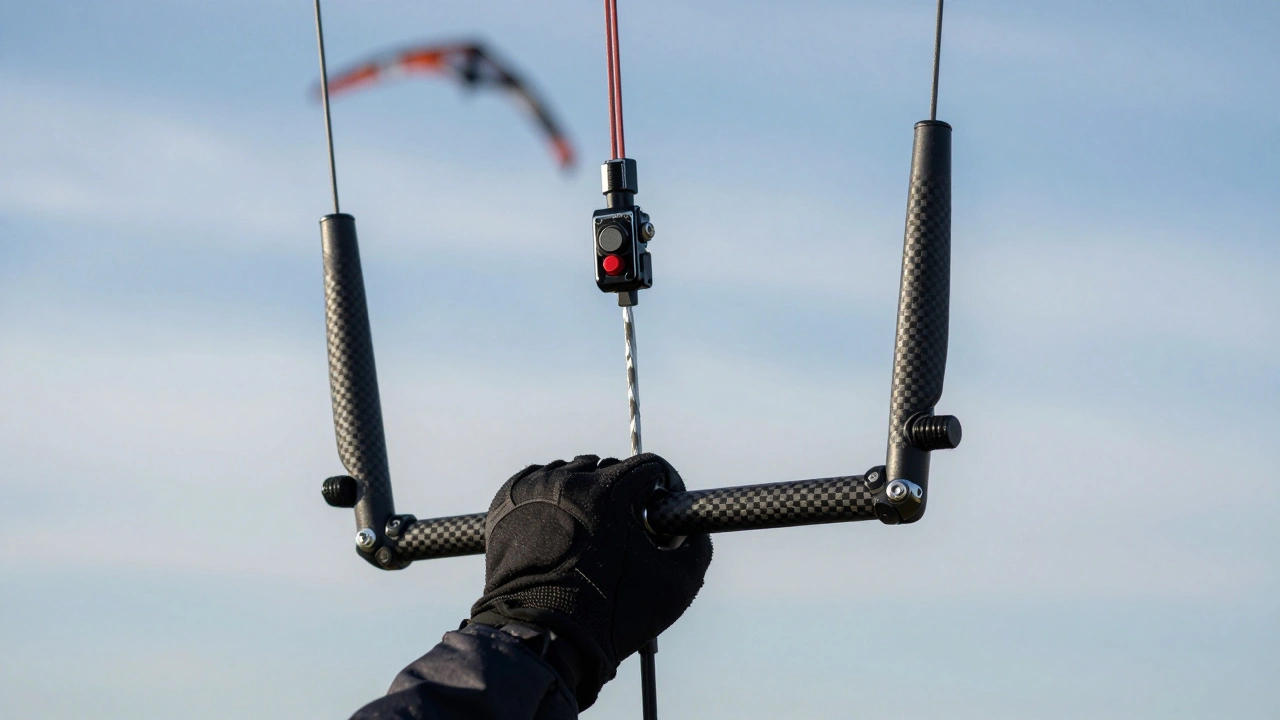
A tension regulator sits between your kite line and your hand. It’s not a brake. It’s a controlled drag system. Most use a simple but effective design: a spool or drum with friction pads, often made of rubber, ceramic, or carbon fiber. As you pull the line, the friction resists sudden releases, smoothing out the energy transfer.
Some regulators have adjustable dials. Turn it clockwise, and the drag increases-ideal for strong winds. Loosen it for light breezes or delicate maneuvers. Others use spring-loaded mechanisms that auto-adjust based on line speed. The best ones don’t add bulk. You shouldn’t feel like you’re holding a small engine.
Here’s how it works in real time:
- You pull the line to turn the kite left.
- Without a regulator, the line snaps taut instantly, jerking the kite.
- With a regulator, the line feeds out gradually, letting the kite bank smoothly.
- When the wind gusts, the regulator absorbs the surge instead of letting it slam into your hands.
- When the wind drops, it holds tension so the kite doesn’t stall.
This isn’t magic-it’s physics. Friction reduces kinetic energy spikes. The result? Smoother arcs, tighter loops, and fewer crashes.
Types of Kite Line Tension Regulators
Not all regulators are the same. The right one depends on your kite type and flying style.
| Type | Best For | Drag Range | Adjustability | Weight |
|---|---|---|---|---|
| Spool with Rubber Pads | Beginners, light wind | Low to medium | Manual dial | 15-25g |
| Spring-Loaded Drum | Advanced freestyle, gusty conditions | Medium to high | Auto-adjusting | 30-45g |
| Carbon Fiber Friction Plates | Competition, precision flying | High, consistent | Micro-adjust screws | 10-20g |
| Integrated Handle | Single-line kites, casual flying | Low | Fixed | 50-80g |
Spool regulators are the most common. They’re affordable, easy to install, and reliable. If you’re flying a basic diamond or delta kite, this is all you need.
Spring-loaded drums are what pro flyers use. They’re built into high-end handles and respond instantly to wind changes. You’ll find them on kites like the Prism Quantum or HQ Symphony.
Carbon fiber plates are the lightest and most precise. Used in championship-level kites, they offer near-zero lag. But they’re expensive and fragile-only worth it if you’re flying in wind tunnels or competitions.
Integrated handles are built into the grip. They’re great for single-line kites, like box kites or parafoils, where fine control isn’t critical. But they’re not replaceable. If they wear out, you replace the whole handle.
When You Need a Regulator (And When You Don’t)
Not every kite needs one. Here’s when you should consider adding one:
- You fly in variable wind (gusty parks, coastal areas, mountain valleys)
- Your kite stalls or dives unexpectedly
- You’re learning complex maneuvers (loops, spirals, stalls)
- You use dual or quad-line kites
- Your hands get sore after flying
On the other hand, skip it if:
- You fly simple single-line kites in steady wind
- You’re flying in calm conditions (like a quiet backyard)
- You’re using a pre-built handle with built-in tension control
Most beginners think they need the fanciest gear. But if you’re flying a cheap plastic kite on a calm afternoon, a regulator won’t help-it’ll just add weight. Focus on wind awareness first. Then upgrade when your skill outgrows your gear.
Installing and Tuning Your Regulator
Most regulators attach to your kite handle with a loop or clip. Here’s how to set it up:
- Remove the existing line from your handle.
- Thread the line through the regulator’s spool or drum.
- Reattach the line to your handle, making sure it runs smoothly without twists.
- Start with the tension dial at the midpoint.
- Launch your kite in light wind. If it feels sluggish, loosen the drag. If it jerks or snaps, tighten it.
- Test turns, dives, and hover maneuvers. Adjust in small increments.
Pro tip: Don’t crank it tight for “more control.” That’s a trap. Over-tightening turns your kite into a brick. You want just enough resistance to smooth out the ride-not stop it.
Check the regulator every few flights. Dirt, sand, and salt can clog the friction surfaces. Clean them with a dry cloth. Never use oil-it turns rubber pads into slick slides.

Common Mistakes and Fixes
Even with a regulator, things can go wrong.
- Mistake: Line tangles around the regulator. Fix: Always wind your line neatly. Use a line winder. A tangled line on a regulator can snap under stress.
- Mistake: Regulator slips during flight. Fix: Make sure the mounting clip is secure. Some models use zip ties-replace them with metal clips.
- Mistake: Kite still stalls. Fix: You’re not the problem. Your kite is. Check the bridle, sail tension, or frame alignment. A regulator won’t fix a broken kite.
- Mistake: Hands get numb. Fix: You’ve over-tightened. Reduce drag. You should feel resistance, not pain.
One user reported their kite flying perfectly after installing a regulator-until they realized they’d accidentally reversed the line direction. The regulator was fighting itself. Always double-check the threading. It’s easier than you think.
Where to Buy and What to Look For
Regulators range from $8 to $120. You don’t need to spend a fortune.
For beginners: Look for brands like Prism a leading kite manufacturer known for durable, beginner-friendly designs or HQ a brand specializing in precision kite systems with advanced tension controls. Their entry-level spool regulators are reliable and easy to use.
For advanced flyers: Try Slingshot a high-performance kite system with carbon friction plates and micro-adjust tension or Flexifoil a brand offering custom tension handles for competition-grade kites. These are pricier but offer unmatched precision.
Avoid no-name brands on Amazon or eBay. Many are poorly made plastic copies that break after one flight. Stick to kite-specific retailers or manufacturers. You’ll pay more, but your kite-and your sanity-will thank you.
Final Thought: It’s Not About Power. It’s About Feel.
Kite flying isn’t about muscle. It’s about timing. A tension regulator doesn’t make your kite fly higher or faster. It makes it feel alive. You stop fighting the wind. You start dancing with it.
Once you’ve flown with a good regulator, going back to plain line feels like driving a car with no suspension. The difference isn’t subtle. It’s transformative.
Upgrade when you’re ready. Not because everyone else has one. But because you’ve outgrown the jerk, the stall, the panic. You want control. Not just flight. And that’s what a tension regulator gives you.
Do I need a kite line tension regulator if I fly a single-line kite?
Usually not. Single-line kites like deltas or box kites don’t require fine control. A tension regulator adds unnecessary weight and complexity. Unless you’re flying in very gusty conditions or doing tricks like figure-eights, stick with a simple handle. Save the regulator for dual-line or stunt kites.
Can I make my own kite line tension regulator?
Yes, but it’s not recommended. DIY versions using rubber bands, washers, or plastic spools often fail under stress. They can snap, slip, or jam, which is dangerous. Commercial regulators are tested for durability and safety. For under $20, buying one is smarter and safer than risking a broken kite or injured hand.
How often should I replace my kite line tension regulator?
Most regulators last 2-5 years with regular use. Signs it’s worn out: slipping even when tightened, inconsistent drag, or visible cracks in the friction material. Clean it after each flight in sandy or salty environments. If cleaning doesn’t fix the issue, replace it. Don’t wait until it fails mid-flight.
Can I use a tension regulator with braided line?
Yes, but choose a regulator designed for braided lines. Smooth lines like Dyneema or Spectra can slide too easily on rubber pads. Look for regulators with ceramic or carbon inserts-they grip braided lines better. Avoid regulators made only for monofilament line.
Will a tension regulator make my kite fly higher?
Not directly. A regulator doesn’t increase lift. But it helps maintain stable flight in turbulent wind, which lets your kite stay in the power zone longer. That means more consistent altitude and fewer drops. So while it won’t make your kite climb, it helps it hold height better.