
Kite pitch is the upward or downward tilt of a kite’s nose relative to the wind flow, which directly dictates lift generation and forward speed. When you fly a kite, you aren’t just holding onto a string; you are managing a delicate balance of forces. If the nose points too high, the kite stalls and drops. If it points too low, it dives uncontrollably. Mastering this angle is the single most important skill for maintaining level flight and achieving precise control.
You’ve probably experienced this frustration: your kite looks perfect in still air, but the moment the wind picks up, it bucks, loops, or refuses to climb. This isn’t bad luck. It’s a physics problem rooted in how the kite interacts with the air stream. Understanding the relationship between pitch, center of gravity, and wind resistance turns a chaotic struggle into smooth, predictable flight.
The Physics of Kite Pitch and Angle of Attack
To control your kite, you need to understand what "pitch" actually means in aerodynamic terms. In aviation, we call this the Angle of Attack (AoA). It is the angle between the chord line of the kite (an imaginary straight line from the leading edge to the trailing edge) and the oncoming wind.
When you pull back on the control lines, you increase the angle of attack. The kite tilts its nose up. This creates more lift because the air has to travel faster over the curved top surface than the bottom, creating a pressure difference. However, there is a limit. Every kite has a stall angle, typically around 15 to 20 degrees for most recreational designs. Go past this point, and the smooth airflow breaks down. The air separates from the surface, drag spikes, lift vanishes, and the kite falls.
Conversely, if you release tension, the nose drops. The angle of attack decreases. Lift reduces, but speed increases. This is why kites dive when you let out line quickly. You are trading altitude for velocity. The goal of stable flight is finding that "sweet spot" where the angle of attack generates enough lift to counteract gravity without causing a stall.
| Pitch Position | Angle of Attack | Lift Generation | Drag Level | Flight Result |
|---|---|---|---|---|
| Nose High | Increased | High (until stall) | High | Climbs or Stalls |
| Neutral | Optimal | Balanced | Moderate | Level Flight |
| Nose Low | Decreased | Low | Low | Dives or Accelerates |
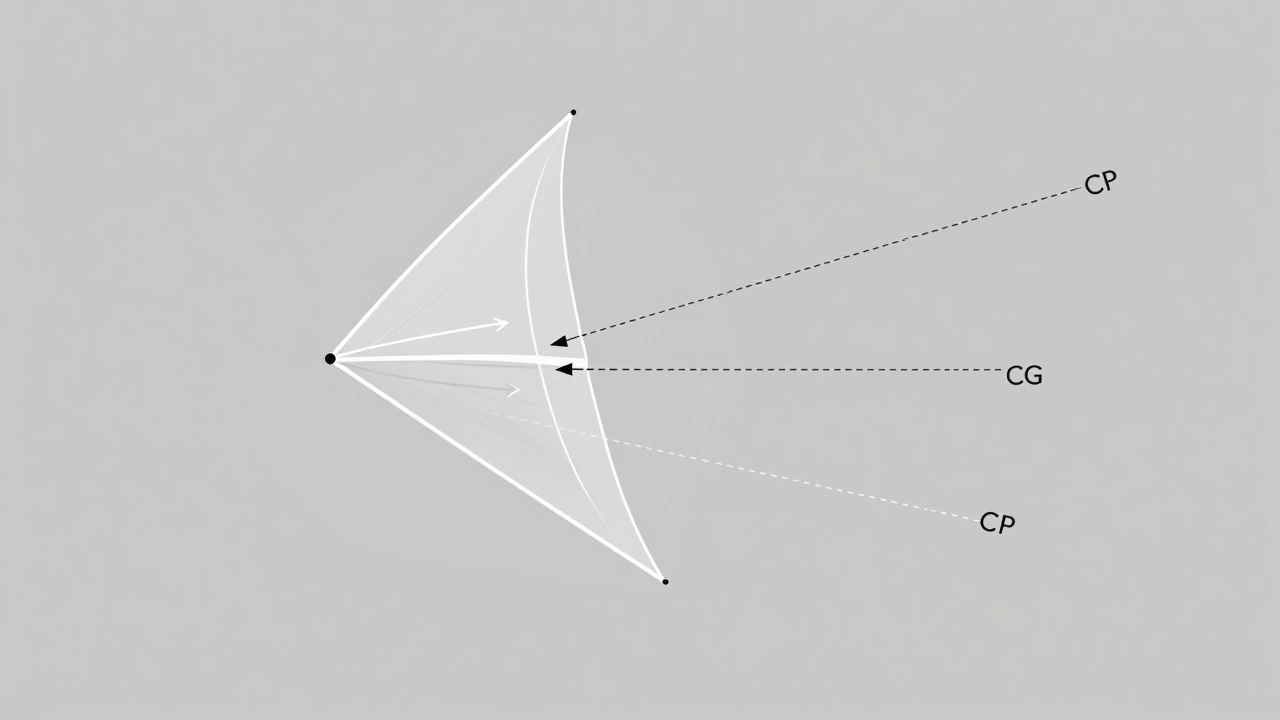
Center of Gravity vs. Center of Pressure
Pitch stability doesn’t come from the pilot alone; it comes from the kite’s design. Two invisible points determine whether your kite wants to stay level or flip over: the Center of Gravity (CG) and the Center of Pressure (CP).
The Center of Gravity is where the weight of the kite balances. If you hang the kite from a string at this point, it stays horizontal. The Center of Pressure is where the total force of the wind acts on the sail. For a kite to be statically stable, the CG must be positioned ahead of (in front of) the CP.
Think of a weather vane. The heavy part always points away from the wind because the pivot point is behind the large surface area. Kites work similarly. If the CG is too far back-perhaps because you added a heavy camera mount near the tail-the kite will become unstable. It might yaw left and right or even flip backward into a stall. To fix this, you move weight forward. Adding a small sandbag to the leading edge or using heavier bridle attachment points near the nose shifts the CG forward, restoring stability.
The Role of the Bridle System
The bridle is the system of strings that connects the kite frame to the main flying line. It is not just a connector; it is the primary tool for setting pitch. Most beginners use a fixed bridle with one attachment point. This limits your control. Advanced flyers use adjustable bridles with multiple attachment points.
By moving the attachment point closer to the nose, you force the kite to fly at a higher angle of attack. This is useful for light winds where you need maximum lift. Moving the attachment point toward the tail lowers the angle of attack, reducing drag and allowing the kite to fly faster in strong winds.
For dual-line stunt kites, the bridle geometry is even more critical. The distance between the two attachment points determines how much the kite rolls and pitches when you pull one line. A wider spread allows for sharper maneuvers but can make the kite twitchy. A narrower spread provides smoother, gentler turns but less aggressive performance. Adjusting these points by just an inch can completely change how the kite feels in your hands.
Wind Conditions and Dynamic Stability
No two flights are identical because the wind is never constant. Gusts, lulls, and turbulence constantly challenge your kite’s stability. Maintaining level flight requires active management of these changes.
In gusty conditions, the sudden increase in wind speed raises the apparent angle of attack. The kite tries to climb aggressively. If you don’t react, it will overshoot and stall. The correct response is to gently ease off the line or steer the kite slightly sideways to reduce the effective wind speed hitting the sail. This keeps the angle of attack within the optimal range.
In lulls, the opposite happens. The wind dies, lift drops, and the kite sinks. Here, you need to add energy. Pumping the kite side-to-side generates artificial wind speed through motion, keeping the airflow attached to the sail. Alternatively, lowering the kite slightly increases its speed, helping it regain lift before climbing again.
- Gust Response: Ease tension or turn away from wind direction.
- Lull Response: Pump wings or dive to gain speed.
- Turbulence: Keep lines taut to prevent slack-induced oscillations.
Design Factors Influencing Pitch Control
Not all kites behave the same way. The shape and structure of the kite dictate its natural pitching tendencies.
Diamond Kites: These traditional designs rely heavily on a tail for stability. The tail adds drag behind the center of pressure, acting like a rudder to keep the nose pointed into the wind. Without a tail, many diamond kites will spiral or loop. The longer the tail, the more stable the pitch, but the slower the flight.
Sled Kites: These flat, wide kites have a very low profile. They generate huge amounts of lift with minimal drag. Because they lack a distinct nose, pitch control is managed almost entirely by the bridle angle. They are incredibly stable in turbulent winds because their large surface area averages out gusts.
Delta Kites: Shaped like triangles, deltas are naturally unstable in pitch. They require precise tuning of the bridle to find the neutral point. Once tuned, however, they offer excellent speed and maneuverability. Their instability makes them ideal for sport flying but challenging for casual users.
Troubleshooting Common Pitch Issues
If your kite is behaving erratically, start by diagnosing the pitch symptoms.
Looping: If the kite repeatedly flips upside down and recovers, the Center of Pressure is likely too far forward, or the tail is insufficient. Add weight to the nose or lengthen the tail. Check if the bridle attachment is too close to the leading edge.
Stalling at Low Altitude: If the kite struggles to climb and hangs vertically, the angle of attack is too high. Move the bridle attachment point further back toward the tail. Ensure the wind isn’t too light for the kite’s size.
Diving Uncontrollably: If the kite shoots toward the ground as soon as you let go, the angle of attack is too low. Move the bridle attachment forward. Check for tears in the sail that might be disrupting airflow near the leading edge.
Yawing (Swaying Side to Side): While primarily a roll issue, severe yawing can affect pitch. This often indicates asymmetry in the frame or uneven tension in the bridle. Inspect the spine for bends and ensure both sides of the bridle are equal length.
Practical Tips for Better Control
Mastering pitch isn’t just about theory; it’s about feel. Here are practical steps to improve your control immediately.
- Use a Wind Meter: Knowing the exact wind speed helps you anticipate how the kite will react. A handheld anemometer costs little but saves hours of frustration.
- Adjust Bridle Incrementally: Never change both bridle points at once. Adjust one side by half an inch, test fly, then adjust the other. Small changes make big differences.
- Fly in Consistent Wind First: Practice pitch control in steady, moderate breezes (8-12 mph). Avoid learning in gusty conditions until you understand the basics.
- Observe the Sail Shape: Look closely at the kite while flying. Is the leading edge bulging? Is the trailing edge fluttering? Visual cues tell you if the angle of attack is correct.
- Practice Recovery Maneuvers: Deliberately stall your kite and practice bringing it back to level flight. This builds muscle memory for real emergencies.
Remember, every kite is unique. Even two identical models may require different bridle settings due to minor manufacturing variations. Trust your eyes and hands more than any manual. The wind is your partner, not your enemy. By respecting the physics of pitch and stability, you transform flying from a guessing game into a precise art form.
What causes a kite to lose stability in gusty wind?
A kite loses stability in gusts when the sudden increase in wind speed pushes the angle of attack beyond the stall threshold. This causes airflow separation and a loss of lift. Additionally, if the Center of Gravity is not properly balanced relative to the Center of Pressure, the kite may yaw or roll excessively, compounding the instability.
How do I adjust my kite's pitch if it keeps stalling?
If your kite stalls frequently, the nose is pointing too high into the wind. You need to decrease the angle of attack. Move the bridle attachment point closer to the tail end of the kite. This pulls the nose down, allowing the kite to slice through the air more efficiently rather than pushing against it.
Why does adding a tail improve kite stability?
A tail adds drag behind the kite's Center of Pressure. This creates a stabilizing torque that keeps the nose pointed into the wind, similar to feathers on an arrow. It prevents the kite from spinning or looping by ensuring the rear of the kite follows the front, maintaining consistent pitch alignment.
What is the ideal angle of attack for level flight?
The ideal angle of attack varies by kite design but generally falls between 5 and 15 degrees for most recreational kites. At this angle, the kite generates sufficient lift to counteract gravity while minimizing drag. Going above 15-20 degrees usually leads to a stall, where lift drops and drag increases sharply.
Can I fix an unstable kite without changing the bridle?
Yes, you can shift the Center of Gravity by adding weight to the nose or removing weight from the tail. Using heavier materials for the leading edge or attaching accessories near the front can help stabilize pitch. However, adjusting the bridle is usually the most effective and reversible method for fine-tuning pitch control.