
You’ve spent hours cutting the sail, gluing the spars, and balancing the tail. You take it to the park, throw it up, and watch it nosedive into a bush or spin wildly like a drunk helicopter. It’s frustrating, but here is the hard truth: your problem isn’t usually the frame or the wind. It’s the bridle. This simple system of strings determines where the kite connects to your flying line, and if that connection point is off by even an inch, your kite will fight you instead of dancing with the air.
Most beginners treat the bridle as an afterthought, tying a knot wherever looks convenient. But in aerodynamics, convenience is the enemy of stability. A properly designed bridle creates the correct angle of attack, allowing the kite to lift efficiently without stalling or diving. Whether you are building a classic diamond, a delta, or a complex box kite, understanding how to attach and adjust this rigging is the single most important skill you can learn. Let’s break down exactly how to get it right so your next flight is smooth, stable, and boringly predictable-in the best way possible.
Why Bridle Geometry Dictates Flight Behavior
Think of the bridle as the suspension system for your kite. It doesn’t just hold the kite up; it controls its pitch. When you pull on the flying line, the tension travels through the bridle legs to specific attachment points on the kite’s spine (the vertical center spar). These points create a triangle of forces. If the apex of this triangle (where the flying line attaches) is too high, the kite becomes unstable and tends to dive. If it’s too low, the kite drags, struggles to climb, and may stall in light winds.
The magic number often cited by experienced fliers is the bridle ratio, typically expressed as a percentage of the spine length from the nose. For many standard single-line kites, placing the tow point between 40% and 60% down the spine works well, but this varies wildly based on shape. A delta kite needs a different geometry than a sled kite. The goal is to find the "sweet spot" where the kite flies at a comfortable angle relative to the wind, generating maximum lift with minimum drag. This isn’t about guessing; it’s about understanding that every millimeter of adjustment changes the physics of the flight.
Choosing the Right Materials for Your Rigging
Before you tie a single knot, pick your string wisely. You might be tempted to use household twine or old shoelaces, but these materials have flaws. Cotton twine stretches significantly when wet or under load, which shifts your bridle point mid-flight and ruins stability. Braided nylon or Dacron fishing line are superior choices because they offer minimal stretch and high tensile strength.
- Dacron: Ideal for larger kites or those flown in strong winds. It has almost no elasticity, ensuring your bridle point stays fixed.
- Braided Nylon: Good all-rounder for medium-sized kites. It’s softer on the hands but has slight give.
- Kevlar/Aramid: Overkill for small backyard kites, but essential for racing kites or heavy loads due to its extreme strength-to-weight ratio.
Avoid monofilament fishing line if possible. While strong, it tends to curl and twist, creating uneven tension on the bridle legs. This twisting force can cause the kite to lean to one side during flight, leading to that annoying spiral dive. If you must use mono, pre-stretch it by hanging a weight on it overnight before tying your knots.
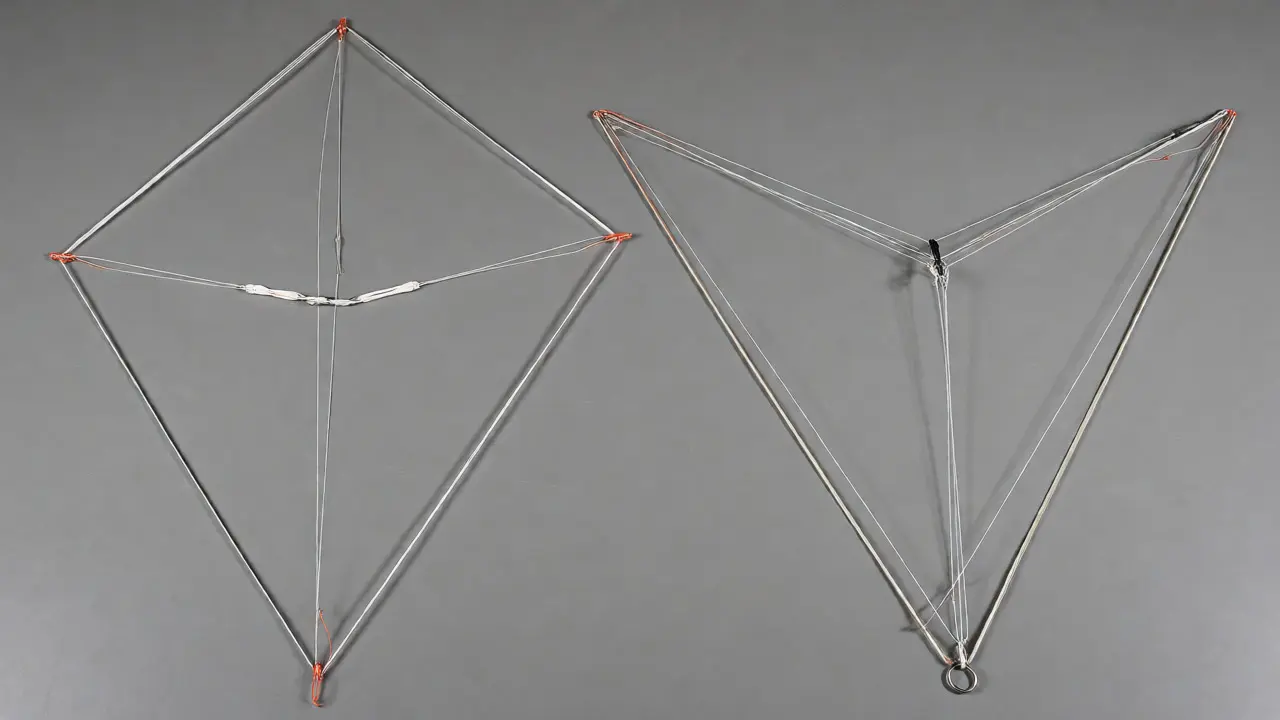
The Two-Point vs. Three-Point Bridle System
There are two main configurations you’ll encounter: the two-point and the three-point bridle. Understanding the difference helps you troubleshoot issues quickly.
| Feature | Two-Point Bridle | Three-Point Bridle |
|---|---|---|
| Attachment Points | Nose and Tail | Nose, Left Wingtip, Right Wingtip |
| Complexity | Low (easy to set up) | Medium (requires precise symmetry) |
| Stability | Good for symmetric kites (diamonds) | Excellent for wide-span kites (deltas) |
| Adjustment | Move tow point along spine | Adjust leg lengths individually |
The two-point bridle is common for diamond and box kites. One leg goes to the nose, the other to the tail. The flying line attaches to a slider or knot somewhere between them. This setup relies heavily on the kite’s inherent balance. If your kite leans left, you likely need to shorten the left bridle leg or move the tow point slightly right.
The three-point bridle is standard for delta and parafoil kites. Legs run from the nose to each wingtip. This triangulation provides lateral stability, preventing the kite from rolling. However, it demands precision. If the left leg is even 5mm shorter than the right, the kite will bank hard to the left. Always measure twice, cut once, and ensure the tow point sits perfectly centered between the wingtips.
Step-by-Step: Attaching the Bridle Correctly
Here is a practical workflow for attaching your bridle to ensure consistency. Don’t skip steps; skipping leads to the "why won’t it fly?" panic later.
- Mark the Spine: Lay your kite flat. Measure the total length of the spine. Mark the calculated bridle point (e.g., 50% down). Use a pencil or removable marker.
- Prepare the Legs: Cut your bridle material to length. Add extra slack (10-15%) to account for knots and adjustments. Burn the ends lightly if using nylon to prevent fraying.
- Attach to Nose: Tie the first leg securely to the top of the spine. Use a bowline knot or a secure lark’s head. Ensure it doesn’t slip.
- Attach to Tail/Wingtips: Depending on your design, attach the second (and third) legs to the designated points. Keep the string taut but not pulling the frame out of shape.
- Create the Tow Point: Bring the loose ends together. Slide a plastic bead or tie a knot to join them. This junction is where your flying line clips on.
- Test Symmetry: Hold the kite by the tow point. It should hang level. If one side dips, adjust the leg length immediately.
Pro tip: Use a sliding knot or a small metal ring for the tow point. This allows you to micro-adjust the position while flying. If the kite dives, slide the ring up toward the nose. If it stalls, slide it down toward the tail. This real-time feedback loop is invaluable for tuning new designs.

Troubleshooting Common Stability Issues
Even with perfect construction, things go wrong. Here’s how to diagnose problems based on flight behavior.
The Nosedive: If the kite shoots straight down, your angle of attack is too steep. The bridle point is likely too far back (toward the tail). Move the tow point closer to the nose by shortening the upper bridle leg or sliding the ring up. This reduces the pitch, allowing the kite to plane more horizontally.
The Stall/Drag: If the kite climbs slowly and shakes violently, it’s dragging. The bridle point is too far forward (toward the nose). Move it toward the tail. This increases the angle of attack, giving the kite more lift authority.
The Spiral Dive: This indicates asymmetry. One bridle leg is tighter than the other. Check your knots. Did you pull one side harder when tying? Is one wingtip heavier due to excess glue or tape? Shorten the longer leg or add a tiny bit of weight to the lighter side to balance it out.
Excessive Shaking: If the kite buzzes or vibrates, the bridle might be too long, causing it to flutter in turbulent air. Shorten the overall bridle length to make the structure more rigid. Alternatively, your sail might be too loose; tighten the spars or re-glue the edges.
Advanced Tuning: Adjusting for Wind Conditions
Wind isn’t static. A kite tuned for a gentle breeze might behave differently in a gusty afternoon. Experienced builders often carry a small tool kit to adjust their bridles on the fly.
In light winds, you want maximum lift. Move the tow point slightly toward the nose (forward). This increases the angle of attack, helping the kite catch scarce air currents. Be careful not to go too far, or you’ll induce drag.
In strong winds, you want stability and speed. Move the tow point toward the tail (backward). This flattens the kite’s profile, reducing drag and preventing it from being overpowered and flipped backward. Some racers use adjustable bridles with multiple preset holes to switch modes instantly.
Remember, there is no single "perfect" bridle setting for all conditions. It’s a dynamic relationship between your design, the material, and the atmosphere. Treat your bridle as a tuning instrument, not a static part. With practice, you’ll develop an intuition for what the kite needs just by watching how it moves in the sky.
What is the ideal bridle length for a diamond kite?
For a standard diamond kite, the bridle point is typically located between 40% and 50% of the spine length from the nose. However, this depends on the width-to-length ratio. Wider kites may require the point further back to maintain stability. Start at 45% and adjust based on flight performance.
Can I use thread instead of specialized bridle line?
You can, but it’s risky for anything larger than a toy. Thread lacks tensile strength and stretches easily, which shifts your bridle point mid-flight. For kites larger than 2 feet, use braided nylon or Dacron to ensure consistent stability and safety.
How do I fix a kite that leans to one side?
A leaning kite usually means asymmetric bridle tension. Check if one bridle leg is shorter or tighter than the other. Loosen the tight side or shorten the loose side until the kite hangs perfectly level when suspended by the tow point. Also, check for uneven weight distribution in the frame or sail.
Does the type of knot matter for bridle attachment?
Yes. Avoid simple overhand knots that can slip under varying loads. Use a bowline knot for permanent attachments to the frame because it holds securely but is easy to untie. For adjustable points, use a sliding knot or a metal crimp sleeve to prevent slipping.
Why does my kite spiral downward?
Spiraling is caused by imbalance. One wing generates more lift than the other. This is often due to unequal bridle leg lengths or uneven frame stiffness. Check your measurements carefully. If the bridle is symmetrical, inspect the wings for damage or warping that might alter the airflow.