Ever launched a kite only to watch it spin in circles, dive straight into the ground, or refuse to climb no matter how hard you pull? More often than not, the problem isn’t the wind or the kite itself-it’s the bridle. The bridle is the network of lines that connect your kite to the flying line. Get it even slightly out of balance, and your kite won’t fly right. The good news? You don’t need fancy gear or a degree in aerodynamics to fix it. With the right bridle adjustment tools, you can turn a frustrating flight into smooth, stable, and powerful lift.
What Exactly Is a Kite Bridle?
The bridle is not one single line. It’s a system-usually made of two or more lines-that runs from the kite’s frame to the flying line. Its job? To distribute the pull evenly and set the kite’s angle of attack. Think of it like the steering mechanism on a sailboat. If the mainsail isn’t trimmed right, the boat won’t catch the wind efficiently. Same with a kite. Too much tension on one side? It’ll loop. Too little? It’ll stall.
Most sport kites use a two-point bridle: one line attaches near the nose (leading edge), and another near the tail (trailing edge). The flying line connects to a knot or ring where these two lines meet. Adjust that knot’s position, and you change how the kite responds. Move it forward, and the kite becomes more responsive but less stable. Move it back, and it flies slower but steadier. Simple. But getting it perfect? That’s where tools come in.
Why Standard Tools Won’t Cut It
You might think: “I’ve been adjusting my bridle with my fingers and a knot for years.” And sure, that works-for basic kites. But if you fly a high-performance delta, a power kite, or a stunt kite that needs precision control, guesswork won’t fly. Wind conditions change. Temperature affects line tension. Even the humidity in the air can shift how your kite behaves.
Without proper tools, you’re guessing. And guessing leads to:
- Unstable flight patterns
- Excessive line twist
- Loss of lift in light winds
- Oversteering or sluggish turns
Real kite flyers don’t rely on trial and error. They use tools designed for one thing: repeatability and precision.
The Three Essential Bridle Adjustment Tools
You don’t need a full workshop. Just three tools. Each one solves a specific problem.
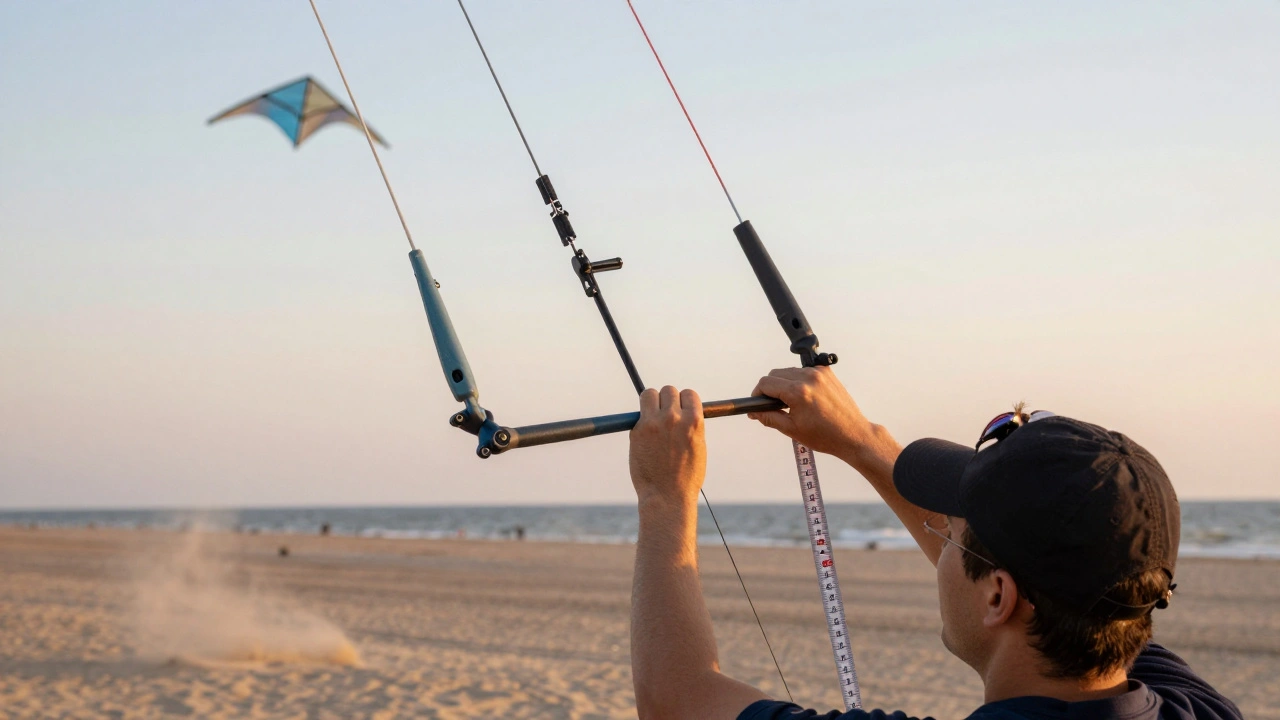
1. Bridle Measuring Tape (or Precision Line Gauge)
Most kite manuals give bridle lengths in centimeters or inches. But when you’re on the beach with wind whipping your hair, measuring with a ruler? Impossible. That’s where a flexible, marked bridle tape comes in. These are thin, durable strips with clear markings every 5mm. Some even have color-coded zones for different kite models.
Why it matters: A 2mm shift in bridle attachment point can make the difference between a kite that soars and one that stalls. A measuring tape lets you replicate settings exactly. If you got it right yesterday in 12mph wind? You can dial it back in today’s 8mph breeze without starting from scratch.
2. Adjustable Bridle Knot Tool (aka Bridle Slider)
This is the game-changer. Instead of tying knots by hand, which stretch, slip, or tighten unevenly, this tool lets you slide a locking ring along the bridle lines. You set the position, lock it in with a tiny screw or clip, and you’re done. No more frayed lines or knots that loosen mid-flight.
Brands like KiteTune and FlexControl make these for common kite sizes. They work with 1.5mm to 3mm bridle lines. Some even have built-in micro-adjustment dials-turn it a quarter turn, and the attachment point moves 1mm. That’s accuracy most pilots don’t even know they need until they try it.
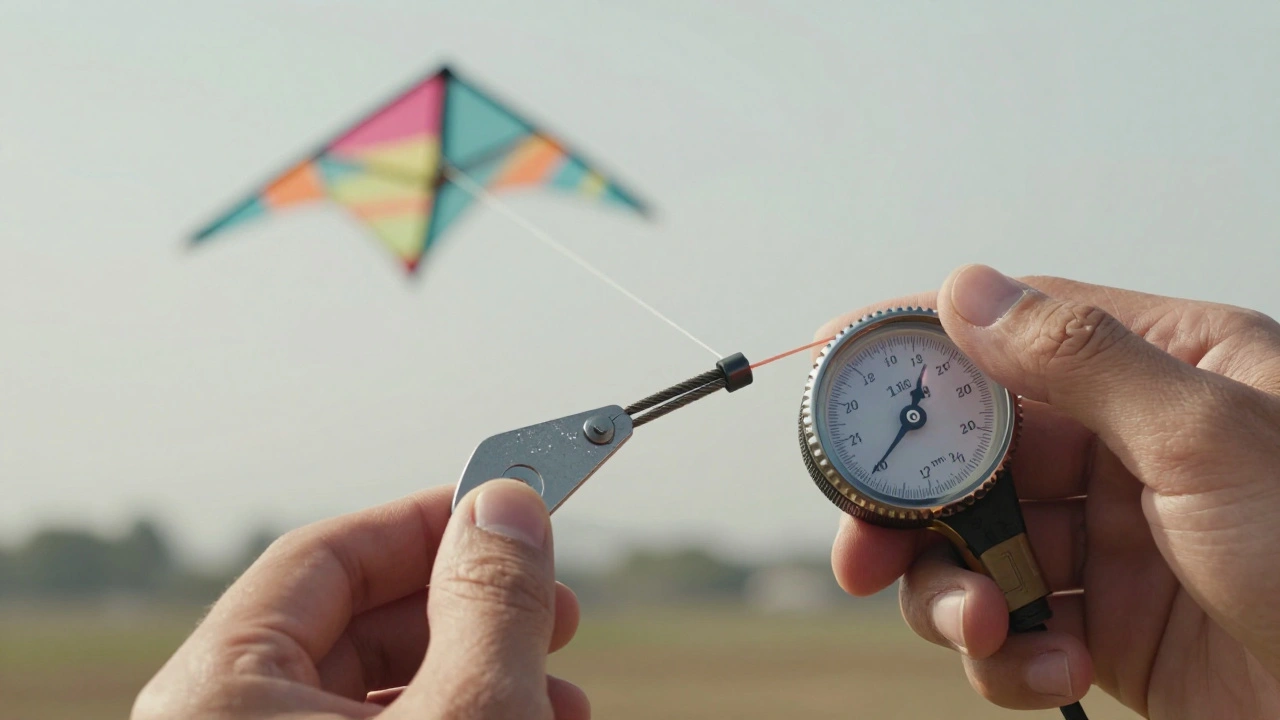
3. Tension Meter (Kite Line Tension Gauge)
This is the professional’s secret. A tension meter measures how tight each bridle line is. It’s not a scale you hang weights on-it’s a spring-loaded device that clips onto the line and gives you a reading in grams or ounces of pull.
Why? Because two lines can look the same length but have different tension. If one side is tighter than the other, your kite will pull to one side. A tension meter catches this. Top kite racers use these before every flight. If your kite veers left in light wind? Check the tension. More often than not, it’s not the wind-it’s a 10-gram imbalance.
How to Adjust Your Bridle: A Step-by-Step Guide
Here’s how to use these tools in real time, even if you’re on a sandy beach with kids running around.
- Start with factory settings. Most kites come with a recommended bridle length. Write it down or take a photo. This is your baseline.
- Measure both bridle legs. Use the bridle tape to confirm each line matches the manual. Even a 5mm difference can throw off flight.
- Attach the slider. Slide the knot tool to the correct position. Lock it. Don’t tie knots yet.
- Check tension. Clip the tension meter onto each bridle leg. Adjust the slider until both sides read within 5 grams of each other.
- Test fly. Launch the kite. Watch how it climbs. Does it yaw? Does it feel sluggish? If it pulls to one side, adjust the slider slightly toward the heavier side.
- Lock it in. Once it flies straight and climbs steadily, tie a secure knot behind the slider. Use a double fisherman’s knot. Then, trim excess line.
Pro tip: Do this in moderate wind-10 to 15 mph. Too light, and you won’t feel the difference. Too strong, and you’ll overcorrect.
Common Bridle Problems and Quick Fixes
Even with tools, things go wrong. Here’s what to look for:
- Kite spins in circles. One bridle leg is longer or looser than the other. Use the tension meter. Equalize.
- Kite won’t climb. The bridle attachment is too far back. Slide the slider forward by 2-3mm.
- Kite dives suddenly. Attachment too far forward. Move it back. Also check for line twist.
- Lines tangle constantly. You’re using knots instead of sliders. Switch to a locking slider. It reduces friction and prevents twisting.

When to Replace vs. Adjust
Not every bridle issue is fixable. If your lines are:
- Frayed at the attachment points
- Stretching noticeably under tension
- Discolored or brittle from UV exposure
-it’s time to replace them. Most kite manufacturers sell replacement bridles. They’re cheaper than buying a new kite. And replacing the whole bridle with a pre-measured, factory-tuned set? That’s faster than adjusting a worn-out one.
As a rule: If your bridle is over two seasons old, inspect it. UV damage is silent. It doesn’t look bad until it fails mid-flight.
What You Don’t Need
Don’t waste money on:
- Electronic flight controllers for beginner kites
- “Magic” tuning kits that promise 10x performance
- Heavy-duty metal tools (they add weight and can damage lines)
Simple, lightweight, and precise is better. Your kite doesn’t need a toolbox. It needs balance.
Final Thought: Precision Beats Power
Most people think better kite performance means stronger wind or bigger kites. It doesn’t. It means better balance. A well-tuned bridle turns a mediocre kite into a responsive, predictable, and joyful flyer. You’ll notice it the first time you launch and the kite climbs straight up without a wobble. No tug. No drama. Just clean, quiet lift.
That’s not luck. That’s adjustment.
Can I adjust the bridle without tools?
Yes, you can adjust a bridle by hand using knots, but it’s imprecise and unreliable. Knots stretch, slip, and change shape over time, especially in humid or windy conditions. Without a measuring tape or tension gauge, you’re guessing. For casual flying, it might be fine. For consistent, stable flight-especially in changing wind-tools are essential.
How often should I check my kite’s bridle?
Check it before every flight session. Even if you flew it yesterday, temperature changes, line absorption of moisture, and minor tugs can shift the balance. If you’re flying in extreme conditions-high wind, salt air, or dusty environments-inspect the lines and sliders after every outing. A 1mm shift can ruin flight stability.
Do all kites need bridle adjustment tools?
Not all. Simple single-line kites (like diamond or box kites) usually come with fixed bridles and don’t require tuning. But any kite with multiple lines, stunt capability, or performance features-like deltas, parafoils, or power kites-will benefit from precise bridle tools. If you’re trying to fly in light winds or compete, tools aren’t optional. They’re necessary.
What’s the best bridle slider brand?
KiteTune and FlexControl are the most widely used and trusted brands among serious flyers. Both offer sliders compatible with common line sizes (1.5mm-3mm) and include locking mechanisms that hold under tension. Look for sliders made from UV-resistant polymer with a low-friction surface. Avoid metal sliders-they add weight and can cut through lines over time.
Can I use a regular ruler to measure bridle length?
You can, but it’s impractical. A rigid ruler won’t bend around curves or fit between lines. A flexible bridle measuring tape is designed to follow the line’s path, even when it’s under tension. Plus, it’s marked in millimeters for fine adjustments. A ruler gives you rough estimates. A bridle tape gives you repeatable precision.