
You are standing in a park, the wind is perfect, and then-crack. Your favorite DIY kite hits a tree branch or lands hard on concrete. The sail has a tear, or worse, a spar is snapped clean in half. Most people toss it in the trash. But here is the truth: you can fix almost any kite damage with stuff you already have at home. You do not need to be an engineer or buy a new toy. You just need to know how to patch the fabric and swap out the skeleton.
Assessing the Damage Before You Start
Before you grab the glue gun, look closely at what broke. Is it the skin (the sail) or the bones (the spars)? This distinction matters because the repair methods are totally different. If your kite is made of ripstop nylon or Tyvek, you are dealing with a material issue. If it is made of plastic bags or old bedsheets, you might need to reinforce the whole section. For the frame, check if the break is near the center (high stress) or at the tip (low stress). A central break needs rigid support; a tip break might just need a sleeve.
Also, check the connections. Sometimes the kite isn't broken, but the bridle lines have slipped or the knots have come undone. Tighten everything up first. If the structure holds but the shape looks weird, adjust the bridle before cutting anything. Once you confirm physical damage, gather your tools. You will likely need scissors, clear packing tape, duct tape, hot glue, and maybe some thin wooden dowels or skewers for splints.
Patching Kite Sails Without Ruining Aerodynamics
A hole in the sail kills lift. Air leaks through, and the kite drags or spins out of control. The goal of a patch is to seal the air leak while keeping the weight down. Heavy patches make the kite nose-heavy, causing it to crash. Light patches keep it flying.
For small tears (under one inch), use clear packing tape. Cut a piece slightly larger than the tear. Round the corners of the tape with scissors. Sharp corners peel off easily when flapping in the wind. Press the tape firmly over the tear from the back side of the sail if possible. If you must patch the front, ensure the edges are smooth so they don't catch the wind like a parachute.
For larger holes or ripped seams, you need a fabric patch. Use a scrap of the same material as the kite. If your kite is ripstop nylon, use ripstop nylon. If it is plastic, use plastic. Apply a thin layer of fabric glue or hot glue around the hole. Place the patch over it. Do not use too much glue. Excess glue adds weight and stiffness, which changes how the kite flexes. Let it dry completely under a heavy book to flatten it out.
| Material | Best For | Weight Impact | Durability |
|---|---|---|---|
| Clear Packing Tape | Small tears, quick fixes | Low | Moderate (peels over time) |
| Duct Tape | Heavy-duty reinforcement | High | High |
| Ripstop Nylon Patch | Large holes in high-end kites | Very Low | Very High |
| Hot Glue | Sealing frayed edges | Medium | Brittle in cold weather |
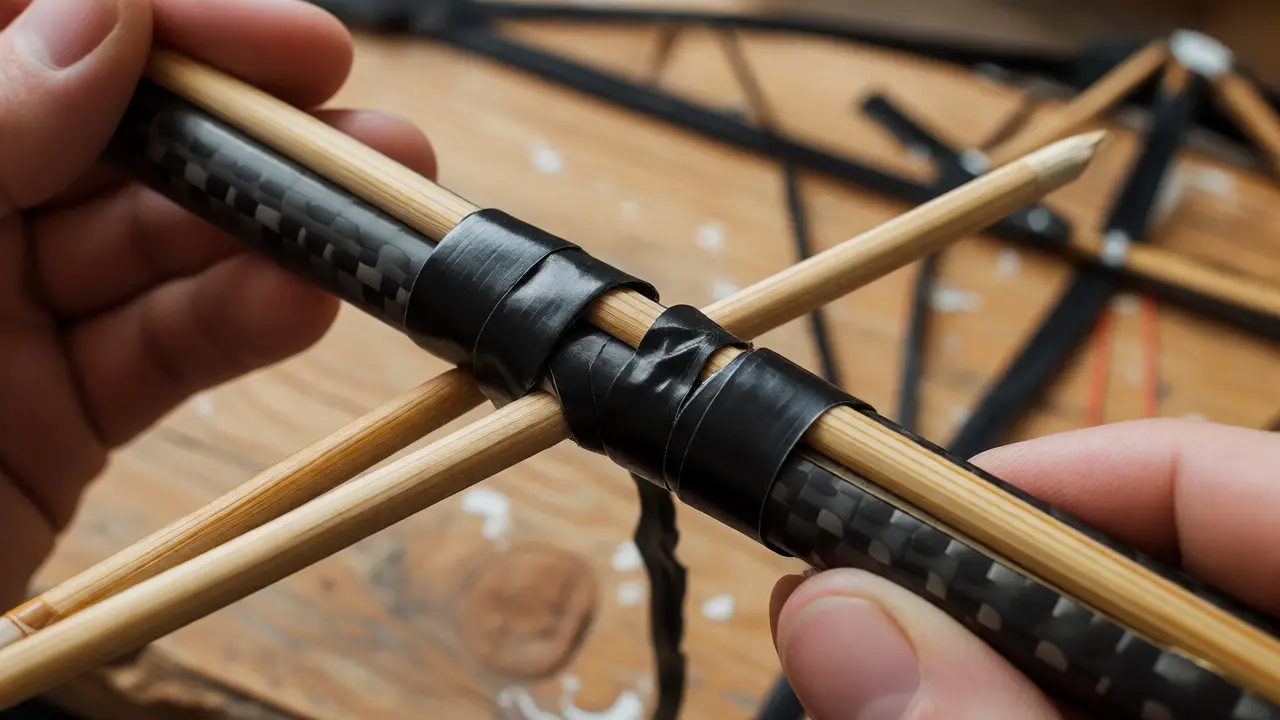
Replacing or Splinting Broken Kite Spars
The spar is the stick that gives the kite its shape. When it breaks, the kite collapses. You rarely replace the entire spar unless it is shattered into multiple pieces. Instead, you splint it, just like a broken bone. This restores strength without adding bulk.
Find two pieces of stiff material that are longer than the break point. Bamboo skewers work great for smaller kites. For larger stunt kites, use carbon fiber rods or fiberglass driveway markers cut to size. Position these splints on either side of the break. Wrap them tightly with electrical tape or thread. The wrap needs to be tight enough to hold the splint in place but not so tight that it crushes the original spar. Test the flexibility. It should bend slightly but not snap again immediately.
If the spar is completely destroyed, you need to fabricate a new one. Measure the length of the old spar. Buy a matching diameter dowel or rod from a hardware store. Slide the new spar through the sail pockets. Secure it with tape or knots at the ends. Make sure the tension matches the other wing. If one wing is tighter than the other, the kite will fly in circles.
Fixing Bridle Lines and Connectors
Sometimes the kite flies poorly not because of the sail or spar, but because the lines are wrong. The bridle connects the kite to the string. If the knot slips, the angle of attack changes. The kite might dive or stall.
Inspect the knots. Are they loose? Retie them using a square knot or a surgeon's knot for better grip. If the line itself is frayed, replace it. Use braided polyester line for durability. It does not stretch as much as nylon, which keeps your kite stable in gusty winds. When attaching the line to the kite, use a loop knot rather than tying directly to the spar. This allows the line to pivot, reducing stress on the connection point.
Check the spreader bars (the horizontal sticks holding the wings open). These often pop out of their sockets. Add a drop of super glue to the socket to lock the bar in place. Be careful not to get glue on the moving parts of a stunt kite. For single-line kites, this is a safe permanent fix.

Rebalancing Your Repaired Kite
After repairing the sail and spars, your kite is no longer identical to its factory state. You added weight with tape or glue. You changed the stiffness with splints. Now you must rebalance it. Hold the kite by the top corner. Does it hang straight? Or does one side dip lower?
If one side dips, add a tiny amount of weight to the opposite side. A small coin taped to the trailing edge works wonders. Adjust the bridle attachment point slightly forward or backward. Moving it forward makes the kite more stable but slower. Moving it back makes it faster but twitchier. Test fly it gently. Watch for spinning. If it spins left, the left wing is dragging. Check for hidden twists in the sail or uneven spar tension.
Wind conditions matter too. A repaired kite might handle light breezes differently than strong ones. In high winds, extra weight helps stability. In light winds, every gram counts. Keep a set of small lead weights or coins in your kit to fine-tune performance on the spot.
Preventing Future Breaks
Repairs are easy, but prevention is easier. Most kite damage happens during launch or landing. Learn to launch properly. Hold the kite upwind and let the wind fill the sail before releasing. Do not throw it. Throwing puts sudden stress on the spars.
Landing is where most crashes happen. Walk the kite down slowly. Do not yank the string. Let the kite glide down. If it starts diving, pull the string gently to bring it up. Store your kite flat, not folded. Folding creates creases in the sail that weaken over time. Keep it in a protective tube or bag to avoid snagging on branches or rocks.
Regular inspection saves headaches. After every few flights, check the spars for cracks. Check the sail for wear spots. Catching a problem early means a five-minute fix instead of a total rebuild.
Can I use Scotch tape to fix my kite sail?
Yes, standard clear adhesive tape works for small tears. However, it may peel off in wet or windy conditions. For a more durable fix, use clear packing tape or specific kite repair tape designed for UV resistance and adhesion.
What is the best material for replacing kite spars?
Bamboo skewers are excellent for small, cheap kites due to their flexibility and low cost. Carbon fiber rods are ideal for high-performance stunt kites because they are lightweight and incredibly strong. Fiberglass driveway markers are a good middle-ground option for medium-sized delta kites.
Why does my kite spin after I repaired it?
Spinning usually indicates asymmetry. One wing may be heavier due to excess glue or tape, or one spar may be stiffer than the other. Check for twists in the sail and ensure both wings have equal tension. Adding a small counterweight to the lighter side often stops the spin.
How do I fix a torn seam on a nylon kite?
Use a zigzag stitch with a sewing machine if available. If you cannot sew, apply a fabric patch over the seam using flexible fabric glue. Ensure the patch extends at least half an inch beyond the tear on all sides to distribute stress.
Is hot glue safe for kite repairs?
Hot glue is effective for sealing frayed edges and securing spar splints. However, it becomes brittle in cold weather and can crack. Avoid using it on high-flex areas of the sail. It is best used on rigid structural components like spar joints.